C-3.1 Describe the Drafting Tools and Materials Tools
Drafting is an essential skill in the piping and plumbing trades. Whether you are preparing a simple sketch for a jobsite layout or reading detailed construction drawings, the ability to understand and create accurate drawings ensures that work is completed safely, efficiently, and to specification. Before you begin drafting, it is important to become familiar with the tools and materials used to produce clear and precise drawings.
This section introduces the most common drafting tools—such as drafting boards, T-squares, triangles, and scale rules (or scales)—and explains how to select, maintain, and use them correctly. A good understanding of these tools will help you develop accuracy and consistency in your drawings and prepare you for more advanced drafting tasks later in your training.
Drafting Board or Table

The surface of the drafting board should be smooth. It should have a true, flat surface, with no warps or twists. The surfaces of most drafting boards are covered with vinyl because it is smooth and even. To allow the vinyl to expand and contract, fasten it only at the top and on one side.
The drafting board or table should have two parallel outside working edges, made of either hardwood or steel. The working edges should be tested for straightness with a steel straightedge. If the edges are not parallel or straight, they should be corrected before you use the board.
Most drafting table tops can be set at different heights from the floor and at any angle from vertical to horizontal. Other drafting tables may not have the same adjustments and can be raised only from a horizontal position to a low slope.
To reduce back strain, use an adjustable drafting stool when working at a drafting table. Tables or boards should be a minimum of 1.2 m (4 ft) in width and 0.9 m (3 ft) in height.
T-Square
The fixed head T-square is used for most work. It should be made of durable materials and have a transparent edge on the blade. To do accurate work, the blade must be perfectly straight. To check the straightness of the blade, mark two points on a sheet of paper. Then, draw a line to join the two points using the blade of the T-square as your guide. Turn the blade over and draw another line to join the same two points (Figure 2). Both lines should be directly over each other if the blade is perfectly straight. T-squares typically have blades that are 0.75 m (30″) to 1 m (42″) long.
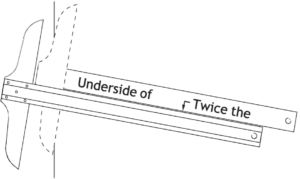
The T-square is used to draw horizontal lines on paper. For right-handed people, it is held tightly against the left edge of the drawing board and moved up and down as required. When making close adjustments, place the fingers of your left hand on top of the square and use your thumb to control the T-square’s movement.
When drawing horizontal lines, incline your pencil in the direction of the line. Hold the pencil point as close as possible to the blade and roll the pencil between your fingers to prevent the point from becoming flat on one side.
Triangles
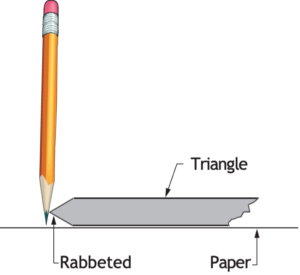
Triangles (set-squares) are made of a clear plastic with rabbeted edges (Figure 3), so that when you draw lines, the edge raised from the tracing paper. This helps prevents smudges and ink blotches.
Triangles are available in 45°—90°—45° or 30°—60°—90° combinations. For most work, triangles should be about 200 mm to 250 mm (8–10″) long. Triangles should be stored flat to prevent warping and should not be placed under other objects. This prevents any pressure put on them, which will cause them to deform.
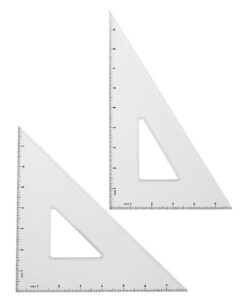
Triangles are used to draw vertical lines and other lines at set angles. Rest the triangle on the T-square blade and slide it along the blade to the desired location. Draw the full length of the vertical line in one pass if possible. Hold the blades of the T-square and the triangle together firmly to prevent any movement when you are drawing. Hold the pencil point as close as possible to the triangle when you are drawing.
Check a triangle for accuracy by drawing a perpendicular line, then reversing the triangle and drawing another perpendicular line (Figure 5).
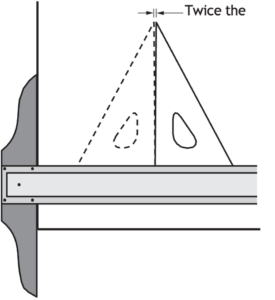
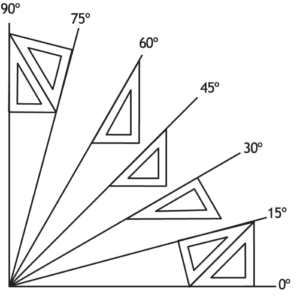
You can also draw 15° and 75° angles by using both a 45°—90°—45° and a 30°—60°—90° in combination. Figure 6 shows how triangles are placed to draw angles that are every multiple of 15°.
Protractor
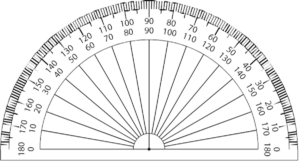
A protractor is a square, circular, or semicircular tool, typically made of transparent plastic or glass, for measuring angles. Most protractors measure angles in degrees while some measure in radians (Figure 7).
Protractors are used for a variety of mechanical and engineering-drafting applications to transfer angles to the drawing sheet. Some protractors are simple half-discs, while others, such as the bevel protractor, have one or two adjustable swinging arms, which can be used to measure angles more precisely.
French Curves and Splines
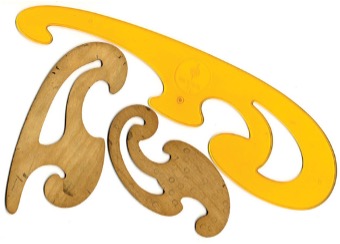
A French curve (Figure 8) is a plastic or metal template designed to help you draw curves. It is often used in the design of cars and dresses. The French curve contains many different curve shapes, but each one is represented over a very short distance only. The French curve allows you to draw and connect curves together so they fit together perfectly without using mathematics calculations.
To use a French curve, align one section with the two points you want to connect, then trace along the edge of the French curve with your pencil. One radius of the curve blends into another radius. It takes a lot of practice to use French curves effectively!
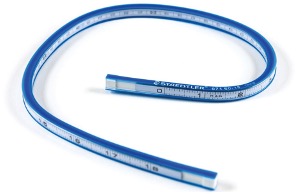
A spline, or the more modern term, flexible curve (Figure 9), can be used instead of a French curve to draw most curves. A spline is a bendable plastic or rubber rod that is reinforced with metal. To use a spline, bend it to the shape of the curve you need and draw along its edge. The design of the spline lets you hold a pencil against an edge and draw an accurate line without smudging. A spline cannot be used to draw tight curves that have a very short radius because the spline will not bend sharply enough. Sometimes a spline is temporarily held in position with small weights.
Drawing Pencils
Manufacturers grade drawing pencils by numbers and letters. These range from 6B (very soft and black) to 9H (the hardest). From 6B the pencils progress through 5B, 4B, 3B, 2B, B and HB, and then to F, the medium grade. After that, they move to the harder graphite: H, 2H, 3H, 4H, 5H, 6H, 7H, 8H and finally 9H. The softer grades are used for sketching and rendering (shading and texturing) drawings. The harder grades are used for more precise instrument drawings.
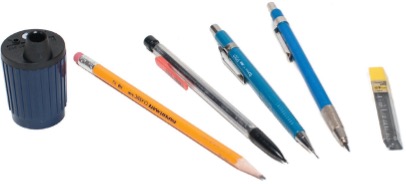
Mechanical pencils are made to hold leads that are bought separately. (Although they are called leads, they are made of graphite.) Most draftspeople use four or five different mechanical pencils with a different lead grade in each. Pipe trades workers are likely to find a 0.7 mm pencil handy. Most mechanical pencils come in different colours so that you can keep track of which lead is in each.
Special pencil sharpeners are used to sharpen wooden pencils and mechanical pencils (Figure 10). However, thin-lead mechanical pencils, with leads as small as 0.5 mm, are available in different grades of lead and do not require sharpening.
Eraser Shields
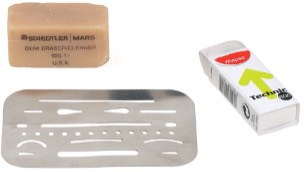
An erasing shield is a thin metal tool used to erase small areas precisely. It has cut-out shapes that allow you to erase only the desired section without affecting surrounding lines. Figure 11 shows two erasers and an erasing shield.
Scale Rules
Scale rules enable you to draw diagrams of piping systems and other objects at a reduced scale and measure distances on scaled drawings.
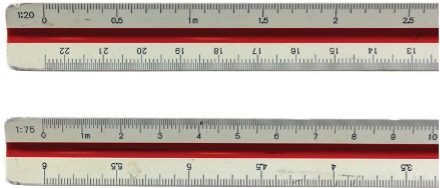
Scale rules come in a variety of types to meet the requirements of many different kinds of work. Most scale rules have three sides and six different scales. The scales are read from either end of the rule.
Common metric scales are expressed in ratios of 1:1, 1:2, 1:5, 1:10, 1:20 and 1:50, or 1:100, 1:200, and 1:500. Because metric units are based on multiples of 10, they are easy to convert between scales to suit your purpose (Figure 12).
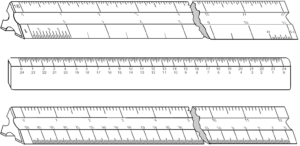
Imperial scale rules may be an architect’s rule, a mechanical engineer’s rule or a civil engineer’s rule (Figure 13); each uses different units. The architect’s scale rule is in inches and fractions of inches. A mechanical engineer’s scale rule comes in inches and decimals of inches. A civil engineer’s scale rule comes in feet and decimals of feet. The most common scale rules are the metric and architect’s scales.
Templates
Templates are thin plastic tools with cut-out shapes. They are used to draw standard symbols and fixtures that are commonly used in a trade. These cut-outs make it easy to trace shapes onto drawing paper quickly and accurately.
Templates contain pre-dimensioned holes in the right scale to accurately draw a symbol or sign. They are available in many forms and sizes, including circles, geometric shapes, and trade-specific symbols such as plumbing fixtures.
Circle templates are used for drawing circles and circle-arcs of certain dimensions. Models are also available for other geometric shapes such as squares and ellipses, as well as many specialized varieties for other purposes.
There are also specific templates that contain the most common symbols in use in different branches of designing. For example, architect templates can be used to draw different sized doors with their opening arcs, building and equipment symbols, plumbing fixtures, and furniture. The templates also provide the symbols for thermal insulation.
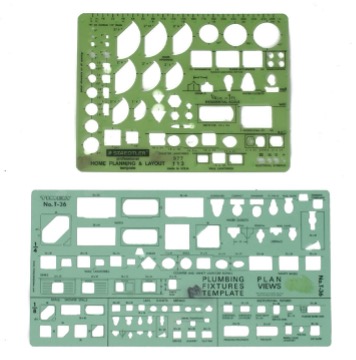
There are templates available for many different trades. Templates that are used by pipe trades workers are the isometric, plumber’s and heating templates (Figure 14).
Compasses
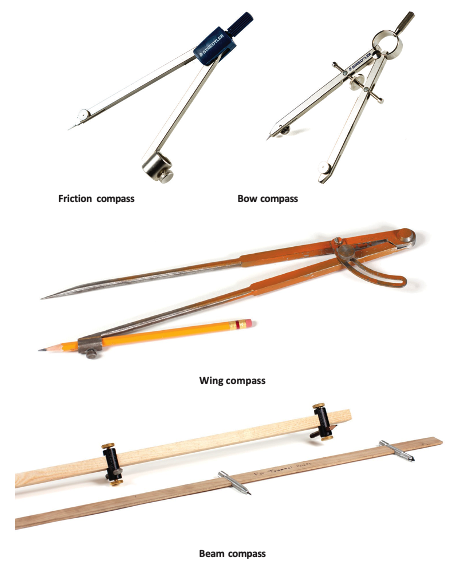
For larger circles and arcs that cannot be drawn with the circle template, you can use a bow, wing or a friction compass. For very large circles, you can use a beam compass. These four types of compasses are shown in Figure 15.
Most compasses can be fitted with leads, pens, or points. For best results, adjust the lead so that it is about 1/32″ shorter than the needle. Both legs will be the same length when the needle penetrates the paper. Fit the compass with lead that is one grade softer than the pencil used to make the drawing. The lead must be kept sharp.
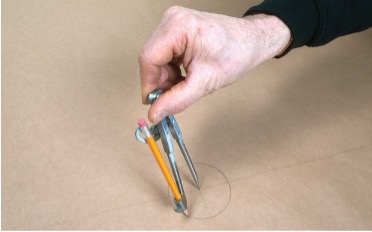
To set the compass to size, draw a line on a piece of clean scrap paper and measure off the required radius. Set the compass on this line. Avoid setting a compass on a scale. Sticking the compass needle into the scale will eventually destroy its accuracy. When using the compass, tilt it in the direction of movement as you draw the line, as shown in Figure 16.
Dividers
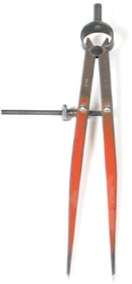
A divider is an instrument used for measuring, transferring, or marking off distances. It consists of two straight, adjustable legs hinged together and ending in sharp points (Figure 17). It is used principally in drafting for accurate transfer of dimensions from a drawing sheet to a measuring device, such as a ruler.

Self-Test C-3.1: Describe the Drafting Tools and Materials Tools
Complete Self-Test C-3.1 and check your answers.
If you are using a printed copy, please find Self-Test C-3.1 and Answer Key at the end of this section. If you prefer, you can scan the QR code with your digital device to go directly to the interactive Self-Test.
References
BCcampus. (n.d.). Playlist: Tools and equipment videos. BCcampus MediaSpace. https://media.bccampus.ca/playlist/details/0_3g8xp22x/categoryId/175673 Playlist Details – Trades Access Common Core Line C: Tools and Equipment Videos – BCcampus
BC Industry Training Authority. (2019). Piping trades apprenticeship program: Use Tools and Equipment—Level 1 harmonized [Binder]. Crown Publications, Queen’s Printer for British Columbia. https://www.crownpub.bc.ca/Product/Details/7960000261_S
- Plumber: Competency C-2 Interpret Drawings and Specifications
- Steamfitter: Competency C-2 Interpret Drawings and Specifications
- Sprinkler Fitter: Competency C-2 Interpret Drawings and Specifications
Camosun College. (2019). Line D: Tools and Equipment—Competency D-3: Competency D-3: Read Drawings and Specifications (Rev. ed.) [Learning guide]. BCcampus. https://collection.bccampus.ca/textbook/yxJ3AwTa/
Camosun College. (2015). Trades Access Common Core Competency D-3: Competency D-3: Read Drawings and Specifications. Victoria, B.C.: Crown Publications. Download for free from the B.C. Open Textbook Collection (https://open.bccampus.ca/browse-ourcollection/find-open-textbooks/).
Media Attributions
All figures are sourced from Industry Training Authority (2019) and/or Camosun College (2019) and are used under the Creative Commons Attribution 4.0 (CC BY 4.0) licence unless otherwise noted. Images copyrighted by the BC Industry Training Authority are licensed under a Creative Commons Attribution-NonCommercial-ShareAlike 4.0 (CC BY-NC-SA 4.0) licence.
A flat surface used for drawing plans and diagrams. (Section C-3.1)
A straight metal ruler used to check if a line is perfectly straight. (Section C-3.2)
A T-shaped tool used to draw straight horizontal lines. (Section C-3.2)
A flat tool used in drafting to draw straight lines and angles. (Section C-3.2)
A raised edge on a tool that helps prevent smudging when drawing. (Section C-3.2)
A tool used to measure and draw angles. (Section C-3.2)
Units used to measure angles. (Section C-3.1)
Another way to measure angles (used mainly in advanced math). (Section C-3.1)
A tool with moving arms used to measure and copy angles accurately. (Section C-3.1)
A tool with curved edges used to draw smooth curved lines. (Section C-3.2)
A flexible tool used to draw smooth curves. (Section C-3.2)
A pencil that uses replaceable graphite sticks instead of wood. (Section C-3.2)
A thin metal sheet with holes used to erase small areas neatly. (Section C-3.2)
A ruler used to measure and draw objects at a smaller or larger size. (Section C-3.2)
A tool with cut-out shapes used to trace standard drawings. (Section C-3.2)
A small compass with a spring or screw that lets you make very fine adjustments when drawing small circles. (Section C-3.1)
A compass with a screw and “wing” adjustment that helps you set and lock the size accurately for repeated circles. (Section C-3.1)
A compass that stays in place using friction (tightness between parts) to hold its size while drawing circles. (Section C-3.1)
A large compass used to draw very big circles or arcs, made with a long bar and adjustable ends. (Section C-3.1)
A tool used to draw circles or curved lines. (Section C-3.1)
A tool with two sharp points used to measure or copy distances. (Section C-3.1)